Planer snipe can be very subtle, sometimes seemingly unnoticeable to the unobservant eye, but when left unchecked, it can add some defects to your stock and subsequently to your finished project.
This is not a pleasing sight or a desired effect, that’s why I’ve tried several means and methods to prevent or reduce snipe when planing the boards I use for my woodworking projects.
I’m going to talk about these methods shortly, but before that, it’s important you know what snipe really is.
Table of Contents
What is Planer Snipe?
Snipe is a wood defect that occurs when a board is being planed, whereby the planer cuts deeper at the beginning and or ends of the board.
Sometimes the snipe can be minor cuts at the ends of the board, while at other times it can be quite severe, showing more visible damage at the ends.
How does this occur?
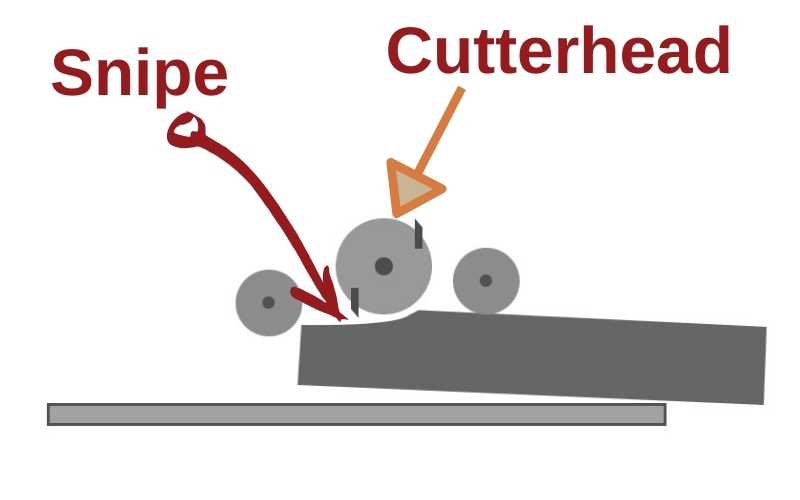
Well, like you already know or suspect, snipe occurs when you plane or sand wood in thickness planers and drum sanders.
These two machines usually come equipped with 2 pressure rollers, the infeed roller and the outfeed roller, with a cutterhead in between both rollers.
When you plane wood, both of these rollers hold down the wood while the cutterhead shaves off some thickness of the wood.
However, each time you send a piece of board through a planer, during the first cut and few seconds, it’s usually held by just one of these rollers (the infeed roller).
Because it’s being held down by just one roller, the first part or the edge of the wood is usually pulled into the cutterhead more, thus more thickness is shaved off it than the rest of the body.
Also, when the wood exits the planer, it loses contact with the first infeed roller and it’s usually held down once again by just one roller (the outfield roller).
As a result, the exiting edge is also pulled farther into the cutterhead causing it to shave off more thickness than the rest of the body.
This is usually how snipe occurs in thickness planers and drum sanders.
8 Ways to Prevent or Minimize Planer Snipe
Dealing with planer snipe can be quite tricky at first especially if it’s your first few times using these machines. With a few changes however, you can start to get the best results when planing boards on your machines.
I’m going to show you 7 methods you can use to prevent or reduce planer snipe. But first, here’s how to identify or check for snipe on your boards after planing.
You can use a long carpenter’s pencil with the graphite exposed lengthwise to rub-off on the edge of the wood you just planed.
When you do this, the high inner spots of the board are going to get stained or covered with graphite, while the low sniped edge will not.
Another way to check for it is to use a raking light. When you shine a light over the surface at a very low angle, raised surfaces on the wood will usually cause a shadow on the shallow or lower surfaces.
This is a fine way to identify snipe. Wetting the surface or using mineral spirits can also help you check for snipes after planing your boards.
Now, here’re 7 planer snipe fixes you can apply today.
1. Raise the ends of the board
Snipe usually occurs while feeding the board into the planer and also when it exits from it. So, one of the best means of preventing the ends of your boards from dipping into the cutterhead is to raise the free or trailing end of the board as you feed the other end into the machine.
While exiting on the other end, you also want to raise the free end as well, so that the weight of the board does not cause the side still inside the machine to deep towards the cutterhead.
This will force the board to stay flat on the planer bed until the outfeed roller makes contact with it and keeps it down for you.
When you do this, you’ll definitely reduce sniping of your boards to a great extent. To ensure this is working, you can try planing a board without applying this method, then checking for snipe.
After that you can plane another board while raising the ends and check the difference to know if it worked or not.
2. Adjusting infeed and outfeed tables
If you find it inconvenient to continually hold up and raise the free end of your boards as they enter and exit the planer machine, then this second option might suit you just fine.
Raise and lower the infeed and outfeed tables of your planer so that they’re slightly above the planer bed (about 1/16 inch higher).
This is possible with portable or benchtop planers which usually come equipped with infeed and outfeed tables for feeding your stock into the machine, unlike stationary models.
So, if you have one of these portable benchtop thickness planers, then you can simply adjust these tables, so that they are raised slightly above the planer bed.
When you do this, instead of raising the boards yourself each time you feed it into the machine, they’re already slightly raised as they enter and exit from the machine, so you don’t have to raise the wood yourself each time.
3. Start and end with a sacrificial stock
Since you want to protect the ends of your stock or board from sniping, why not use a sacrificial stock to start and end the planing process?
Here’s how it works. First send a sacrificial board of the same thickness with the board you want to plane through inside the planer, then butt your main stock directly behind so that it’s touching the sacrificial board.
Continue pushing the sacrificial or lead board with your main board until the front of the main board just passes the infeed roller.
Then follow up with another sacrificial board using the same method, so that the ends of your main stock are never isolated inside the machine at any given time.
This will ensure that the snipe occurs on the sacrificial boards instead of your main stock.
4. Simply cut off the sniped ends
This is not a method I resort to often, but it’s something you should consider as well. If the sniping at the ends of your boards are just very steep, and the previous methods shown here have failed to fix it, you can always cut off the sniped ends of the boards.
To do this however, you have to always make sure that your initial measurement of stock accounts for snipe. That means if you need a 35 inch board length, and the planer snipes 2 inches of the board’s edges, then you have to make your measurement 39 inches, so you can cut off 2 inches from both ends after planing the board.
This seems kind of wasteful, but it’s one solution you need to consider when all else fails.
5. Glue up sacrificial side runners
This technique is best for planing wide boards, like when you’ve glued multiple boards together. Instead of just planing this glue-up like that, you can glue up to the sides of the board thin strips of sacrificial stocks (side runners) that are longer than your main stock on both ends.
The extension of the side runners on both ends should compensate for the snipe, and your main stock should be without snipe after planing is done.
6. Use a carrier board for thin boards
Planing thin boards can be very tricky because of their size, they can flex or bend inside the machine, which can lead to even worse defects on the stock.
To avoid this and add stability to your board, just use a carrier board that’s thicker and more stable, such as MDF.
You can adhere your thin board to the thicker board by means of a stop block of smaller thickness to your main stock. The stop block is glued to the thick board, while the thin stock is placed after it to prevent it from moving backwards as it goes through the planer.
7. Raise rollers on stationary planers
Unlike portable thickness planers, big industrial models usually come equipped with rollers on the planer bed. You can raise these rollers on some models by 0.002 inches above the table. This will help prevent or reduce snipe as you plane boards with it.
If raising the rollers does not prevent or reduce the snipe, you can always take them back level with the bed.
8. Feed boards in at an angle
This might not seem like much, but it does reduce snipe to a large extent. Instead of feeding the boards straight into the planer bed, you can feed it in at angles between 15 and 30 degrees.
When you do this, the feed rollers does not attack the front edge all at once, but allows it to ease into the machine. Couple this with a little raise of the trailing end, and raising of the free end as it exits the machine, you’ll get a near snipe-free stock on the other side.
Now there you have it. 8 ways to deal with planer snipe. You can try each of them depending on the type of machine you have, but most importantly, stick to what works best for you.
Snipe can sometimes be very subtle, its important to look for it during your finish prep. Wetting the surface with mineral spirits can sometimes reveal a trouble area. And one way to really amplify problems on the surface is to use a raking light. Any light shining over the surface at a very low angle will achieve the desired effect. The reason why this works is because the low angle of the light creates a very long shadow for anything sitting proud of the surface. This makes it very easy for our eyes to see. A good analogy is to think of what happens in the city when the sun rises and sets. When the sun is at that low angle, the shadows of the buildings are very long. The longer the shadow, the taller the building. So any surface flaws are amplified by this shadow effect. This is very handy before, during, and after finishing and will improve the overall quality of your finish. Pardon the digression, but I love the raking light! In a similar vein, you can use long support rails to prevent snipe. By attaching a couple of strips of wood, about a foot longer than your workpiece (but equally thick), you ll wind up with snipe-free boards all day long.